Nmap
Network Mapper (Nmap) can be used to scan target machines and/or entire networks for items such as open ports, vulnerable services, etc.
Table of Contents
- Basic Usage
- Scan an IP List
- Scan Multiple IP addresses
- Nmap Scripting Engine (NSE)
- Scan Usage Examples
- Connect Scan (TCP)
- UDP Scan
- Version Scan
- Output Format
- Bypassing Firewalls and Other Defences
- Decoys
- DNS Proxying
Basic Usage
To use Nmap, we can use the following command:
nmap 127.0.0.1
Command breakdown:
127.0.0.1- Specify the target to scan.
To scan an entire network, we can use the following command:
nmap 10.10.0.0/16
Command breakdown:
10.10.0.0/16- Specify the network address and CIDR notation of the target.
To use flags, we can use the following command:
nmap -sV -sT -Pn --packet-trace 10.42.0.1
Command breakdown:
-sV- Specify to scan for the version of all services.-sT- Specify to perform a TCP connect scan.-Pn- Disable ICMP Echo Requests.--packet-trace- Show all sent and received packets.10.42.0.1- Specify the target to scan.
Nmap is very versatile and can be chained with multiple flags and options to perform a comprehensive scan of the target.
The following table will list some common flags and their use cases.
| Flag | Description |
|---|---|
| -sV | Perform service version detection. |
| -sS | Perform a TCP-SYN scan. |
| -sT | Perform a TCP connect scan. |
| -sA | Perform a TCP ACK scan. |
| -sU | Scan all ports with UDP. |
| -sO | Scan for the operating system. |
| -sC | Use default Nmap NSE scripts. |
| -A | Perform OS and version detection, default script scanning, and traceroute. |
| -iL | Specify a file with a list of targets. |
| -PE | Specify to perform ping scans. |
| -Pn | Disables ICMP Echo requests. |
| -sn | Disable port scanning. |
| -n | Disable DNS resolution. |
| --disable-arp-ping | Disables ARP ping. |
| --packet-trace | Show all sent and received packets. |
-p <Port Number>/-p 80/-p 80-443/-p- | Scan the specified port number/Scan only port 80/Scan the port range from port 80 to port 443/Scan all ports. |
--source-port/--source-port 53 | Specify the source port to use/Specify to use port 53 as the source port. |
-D/-D RND:<0-128>/-D RND:5 | Specify to use decoys/Specify the number of random IP addresses to be generated/Specify 5 IP addresses to be generated as decoys. |
| --scripts | Specify scripts to use. |
-oN <File_Name>/-oX <File_Name>/-oG <File_Name>/-oS <File_Name> /-oA <File_Name> | Specify the file to output to in normal/XML/grepable/Script Kidde/all formats. |
-T/-T <0-5>/-T 3 | Specify how fast to scan/Specify the number from 0 to 5/Specify the speed to 3. |
--min-rate=/--min-rate=100 | Specify how many packets to send simultaneously/Specify to send 100 packets simultaneously. |
The below table will show some possible results you can get from Nmap and their description.
| States | Description |
|---|---|
| open | This indicates that the port is open and a connection to the scanned port has been established. |
| closed | This indicates that the port is closed. Usually, when a port is closed, it will send a packet with a RST flag. |
| filtered | Nmap cannot correctly identify if the port is open or closed as there is no response from the target or an error code has been received. |
| unfiltered | This occurs during the TCP-ACK scan which means that it is accessible but Nmap is unable to determine if it is open or closed. |
| open|filtered | This indicates that a firewall or packet filter may protect the port. No response was received for the specific port. |
| closed|filtered | This indicates that it is impossible to determine if the scanned port is closed or filtered by a firewall. This state only occurs in the IP ID idle scans. |
Scan an IP List
To scan a range of IP addresses, we first need a list of IP addresses. The following will be the content of a file called "host.lst" which will then be used in nmap.
10.10.10.1
10.10.10.2
10.10.10.55
10.10.10.100
10.10.10.200
Once we have our file, we can use the following command to scan it.
nmap -sV -iL host.lst
Command breakdown:
-sV- Scan the version of all targets.-iL- Specify the file with the IP addresses to scan.
Scan Multiple IP Addresses
To scan multiple IP addresses, we can specify them as seen in the following example:
nmap -sV 10.10.10.1 10.10.10.2 10.10.10.30
If the IP addresses are next to each other, we can specify the range in their respective octet.
nmap -sV 10.10.10.1-5 -oN results.txt
Command breakdown:
-sV- Scan the version of all targets.10.10.10.1-5- Specify the range of IP addresses to scan.-oN results.txt- Specify to output to the "results.txt" with normal output.
Nmap Scripting Engine (NSE)
NSE provides us with the possibility to create scripts in Lua for interaction with certain services. There are a total of 14 categories into which these scripts can be divided:
| Category | Description |
|---|---|
| auth | Determination of authentication credentials. |
| broadcast | Scripts which are used for host discovery by broadcasting and the discovered hosts, can be automatically added to the remaining scans. |
| brute | Executes scripts that try to log in to the respective service by brute-forcing with credentials. |
| default | Default scripts executed by using the "-sC" option. |
| discovery | Evaluation of accessible services. |
| dos | Scripts used to check services for denial of service vulnerabilities. These are used less as it harms the services. |
| exploit | Scripts that tries to exploit known vulnerabilities for the scanned port. |
| external | Scripts that use external services for further processing. |
| fuzzer | Scripts that identify vulnerabilities and unexpected packet handling by sending different fields, which can take a long time. |
| intrusive | Scripts that are intrusive that could negatively affect the target system. |
| malware | Scripts that check if some malware infects the target system. |
| safe | Defensive scripts that do not perform intrusive and destructive access. |
| version | Extension for service detection. |
| vuln | Identification of specific vulnerabilities. |
We have several ways to define the desired scripts in Nmap.
Default scripts:
nmap <target_IP_Address> -sC
Specific Scripts Category:
nmap <target_IP_Address> --script <category>
Define Scripts:
nmap <target_IP_Address> --script <script-name>,<script-name>
For example, if we want to scan SMTP, we can use the following command:
nmap 10.129.24.110 -p 25 --script banner,smtp-commands
Command breakdown:
10.129.24.110- Specify the target to scan.-p 25- Specify the port to scan.--script banner,smtp-commands- Specify the scripts to use.
Alternatively, we can perform a more aggressive scan by using the -A option. This will scan the target with multiple options such as service detection (-sV), OS detection (-O), traceroute (--traceroute), and the default NSE scripts (-sC).
Scan Usages Examples
There are a lot of different ways to use Nmap to enumerate our target(s). Below are just some examples of the scans that can be performed.
Connect Scan (TCP)
The TCP connect scan (-sT) uses the TCP three-way handshake to determine if the specific port is open. This option is also the most accurate and stealthy method to determine a port state.
Unlike other scan types, the connect scan does not leave any unfinished connections or unsent packets which is less likely to be detected by intrusion detection system (IDS) and intrusion prevention system (IPS).
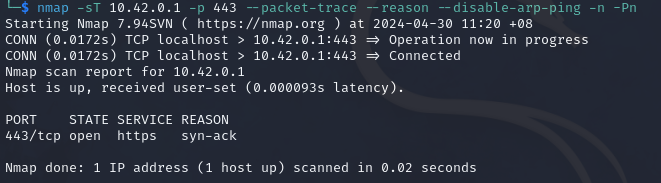
The following example will perform a scan on port 443.
nmap -sT 10.42.0.1 -p 443 --packet-trace --reason --disable-arp-ping -n -Pn
Command breakdown:
-sT- Specify to perform a TCP SYN scan.10.42.0.1- Specify the target to scan.-p 443- Specify the port to scan.--packet-trace- Show all packets sent and received.--reason- Show the reason.--disable-arp-ping- Disables ARP ping.-n- Disables DNS resolution.-Pn- Disable ICMP Echo Requests.
UDP Scan
As UDP is a stateless protocol, we do not need the three-way handshake. Thus, we do not get any acknowledge. Due to this, the timeout is much longer making UDP scans (-sU) longer than TCP scans.
To perform a UDP scan, all we need to do is use the -sU flag.
nmap -sU -F 10.42.0.1
Command breakdown:
-sU- Perform a UDP scan.-F- Scan the top 100 ports.10.42.0.1- Specify the target to scan.
Another disadvantage of performing a UDP scan is that we often do not get any response because Nmap sends empty datagrams to the target. Nmap is unable to determine if the UDP packet has arrived successfully or not. If the UDP port is open, we will only get a response if it is configured by the application to do so.
Version Scan
To perform a version scan, we can use the -sV flag.
nmap -sV 10.42.0.1
Command breakdown:
-sV- Specify to scan the version of all services.10.42.0.1- The target to scan.
Output Formats
Nmap supports a few output formats:
-oN- Normal format.-oX- XML format.-oGGreppable format.-oS- Script kiddie format.-oA- All formats.
An example will be outputting it to a file called "scan" in XML format.
nmap -sV -sT 10.42.0.1 -oX scan
Command breakdown:
-sV- Scan for the version.-sT- Perform a connect scan.10.42.0.1- Specify the target to scan.-oX scan- Save the results in XML format in the file called "scan".
Bypassing Firewalls and Other Defences
In real life networks, there is a high chance that there will be some sort of defence in place such as firewalls, IDS and IPS systems. This section will list some common ways that we can use to attempt to bypass such defences.
Decoys
This scan will get Nmap to generate various random IP addresses inserted into the IP header to disguise the origin of the packet sent. We can generate a specific number of random (RND) IP addresses. For example, we can use RND:5 where we will be generating 5 IP addresses (separated by a colon).
Our real IP address will then be randomly placed between the generated IP addresses. Another critical point is that the decoys must be alive. Otherwise, the service on the target may be unreachable due to SYN-flooding security mechanisms.
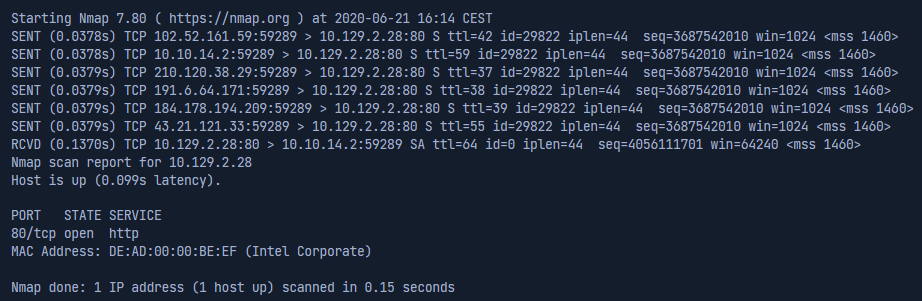
The following command is an example usage:
nmap 10.129.2.28 -p 80 -sS -Pn -n --disable-arp-ping --packet-trace -D RND:5
Command breakdown:
10.129.2.28- Specify the target to scan.-p 80- Specify the port to scan.-sS- Perform a SYN scan.-Pn- Disable ICMP Echo requests.-n- Disable DNS resolution.--disable-arp-ping- Disables ARP ping.--packet-trace- Shows all packet sent and received.-D RND:5- Specify to use Decoys and generate 5 random IP addresses.
The spoof packets are often filtered out by ISPs and routers, even though they came from the same network range. Therefore, we can also specify our VPS servers' IP addresses and use them in combination with "IP ID" manipulation in the IP headers to scan the target.
Another scenario would be where only individual subnets would not have access to the server's specific services. We can specify the source IP address (-S) to test if we can get better results. Decoys can be used for SYN, ACK, ICMP scans, and OS detection scans.
DNS Proxying
By default, Nmap performs a reverse DNS resolution unless otherwise specified to find more important information about our target. We can still specify our own DNS servers by using the --dns-server switch. This method could be fundamental to us if we are in a demilitarized zone (DMZ). Usually, the company's DNS servers are more trusted than those from the internet.
An example will be where we can use TCP port 53 as a source port (--source-port) for our scans. If the firewall is configured to control this port and is not filtered by the IDS/IPS properly, our TCP packets will be trusted and will be able to pass through.
The below examples will demonstrate how this works:
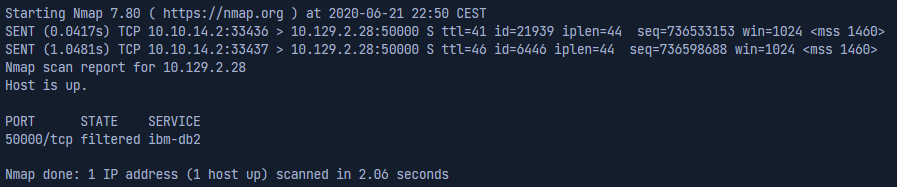
SYN-scan of a filtered port
nmap 10.129.2.28 -p 50000 -sS -Pn -n --disable-arp-ping --packet-trace
Command breakdown:
10.129.2.28- Specify the target to scan.-p 50000- Specify the port to scan.-sS- Perform a SYN scan.-Pn- Disable ICMP Echo requests.-n- Disable DNS resolution.--disable-arp-ping- Disables ARP ping.--packet-trace- Shows all packet sent and received.
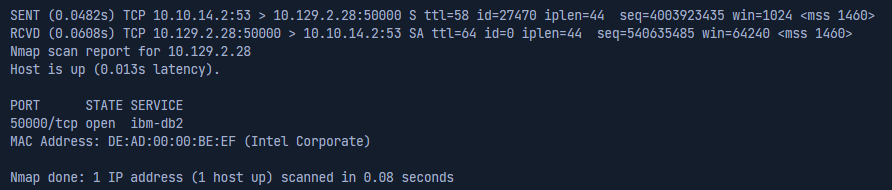
SYN-Scan from a DNS port
nmap 10.129.2.28 -p 50000 -sS -Pn -n --disable-arp-ping --packet-trace --source-port 53
Command breakdown:
10.129.2.28- Specify the target to scan.-p 50000- Specify the port to scan.-sS- Perform a SYN scan.-Pn- Disable ICMP Echo requests.-n- Disable DNS resolution.--disable-arp-ping- Disables ARP ping.--packet-trace- Shows all packet sent and received.--source-port 53- Specify the source port to use.
Now that we know that TCP port 53 is accepted, it is very likely that the IDS/IPS filters might also be configured much weaker than others. To test this, we can use netcat:
nc -nv --source-port 53 10.129.2.28 50000
Command breakdown:
-nv- Specify to use a IP address and not a domain name (-n) and use verbose mode (-v).--source-port 53- Specify the source port to use.10.129.2.28- Specify the target to connect to.50000- Specify the port to connect to on the target.